Thank you for stopping by!
Snow is a big topic in our house these days. With our outdoor walks through the snow, our real and pretend snow sensory bins, and a lot of snow fall and plow watching out the window, "snow" is one of the most common words I hear from Skyler. I unrolled a new rug in our entry way yesterday and some new-rug-dust started floating around. Skyler began running around pointing at the dust saying "snow, snow!!" (which sounds like a very nasal "no" with a slight 's' in the beginning!)
With his interest in all things snow, I decided to do a couple of projects inspired by snow. Both were well received and took him a long time to work on (I love when projects last half an hour or more with an 18 month old - I know he must really like it!) I tried to incorporate a lot of materials that Skyler does not often use. He enjoyed working with some unfamiliar art mediums.
For our first project, I gave Skyler a square of tin foil. He had a lot of fun tearing it up and I helped him roll it into balls.
I drew lines with glue stick on a piece of blue construction paper and Skyler filled the page with pieces of tin foil.
It was so simple and the result was a great piece of art that Skyler helped create the materials for with the tin foil balls. It looked like a winter snowfall! While tearing up the tin foil, Skyler also enjoyed making it "snow" on one of his kitties, so he helped Mama clean up with his little broom and pan afterward! He ended up walking individual pieces to the garbage can because he thinks that is more fun.
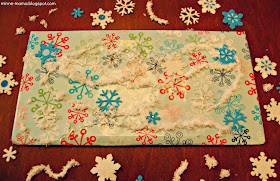
The next snowy craft we did used two recycled Christmas items - scrap snowflake wrapping paper and a piece of cardboard box that a gift came in. Along with those recycled items, we used the extra fluff that was trimmed off the snowballs from our sensory bin. It was a very 'green' project :)
When Skyler and I were shopping before Christmas, I pushed the cart down the wrapping paper aisle and he shot his arm out, grabbing this snowflake wrapping paper and he wanted to hold it as we walked around the store. I ended up using it as Skyler's paper, all of his gifts wrapped in blue paper with colorful snowflakes. I used it for this project by wrapping it around the piece of cardboard.
 |
| "Yeah, yeah, yeah!!" |
First, I gave Skyler some foam snowflake stickers. Usually he loves to peel the backs off himself (we decorated his pumpkin with finger paints and then sparkly ghost, spider, and bat stickers when it dried), but these stickers were quite hard to peel, so I did most of that.
Next, I gave baby boy some glue and let him go at it. He loved making little dots and after I showed him how to squeeze the bottle, he filled the entire thing! I was pretty impressed for his first time using glue from the bottle on his own!
Next we added the fluffy snow leftover from our sensory bin. This was a lot of fun. Skyler put handful upon handful (and then of course dumped the whole bowl - so fun!) on and I would pick up the cardboard to knock it off and he would do it all over again, and eventually all of the areas with glue were covered in snow.
Skyler's finished snowy artwork is so fun and it will make a fun sensory board when it dries. It is fuzzy, bumpy, rough, and so soft, among other descriptive words we can use when playing with it!
Another idea would be this craft that Skyler did in ECFE in October (I think it was as a spiderweb for Halloween, but would also work for snow). The only materials needed are construction paper and white chalk. Skyler really likes coloring with chalk, it is such a fun medium for little hand's to explore with! I still have it on the fridge after two months because I love the look of it and remember how much he enjoyed making it.
These two crafts were so fun because of Skyler's current interest in snow. I always try to appeal to what he is interested in at any time, and it helps to create activities that he is really excited to do!


안동콜걸
ReplyDelete안동콜걸
전주콜걸
무주콜걸
전주콜걸
영주콜걸
군산콜걸
영주콜걸
군산콜걸
장수콜걸
Really nice and informative blog, keep it up buddy…
ReplyDelete-ag
Such a excellent post. Continue for sharing like this, Its helpful info
ReplyDelete-ag
Thank you for ssharing this
ReplyDelete-ag
Great blog love to read thanks for sharing such well written .
ReplyDelete-ag
Nice post. I learn something totally new and challenging on blogs, Its great.
ReplyDelete-ag
Having read this i thought it as really informative.
ReplyDelete-ag
It's looking good.
ReplyDelete-ag