Tuesday, January 28, 2014

Valentine Contact Paper Play

Minne-Mama is on Facebook! 'Like' us to stay updated on our fun crafts and activities!
Thank you for stopping by!

Since taking down our contact paper Christmas tree earlier this month, I have been planning on a big Valentine heart for our next play invitation. This contact paper heart was simple to make, and Skyler was excited to have a new contact paper shape to play with!

To make the heart shape, I measured out a piece of contact paper to fill the sliding glass door. Then I used acrylic paint on the non-stick side and painted on a large heart outline.


Once it dried, I cut out around the heart shape and added rounds of tape to the non-stick side. 


Using the non-stick side with the tape, I pressed the heart onto our sliding glass door. 


The invitation to play was completed with a cute Valentine towel (with owls on it, of course...I kind of love owls!) for Skyler to sit on, and some felt hearts (they have a sticky side, but we do not need to take that off to play, and can re-use them when we are done with the contact paper - they are the same ones I used to hang our coffee filter bunting).


When we were ready to play, all I had to do was peel off the contact paper to reveal the sticky side. Skyler saw the heart shape when he woke up from his nap and ran over, very ready to play!


Just like our contact paper tree, Skyler loved this activity. Feeling the sticky paper, picking out the hearts to put onto the contact paper, and being my little ham, as always! He likes to fill up the whole heart, take the little hearts off, and fill it back up! Skyler did such a wonderful job of filling the heart up today. Baby boy only took a break because he got hungry and needed a snack :) I know our interactive decoration will get a lot of use in the next few weeks!


Monday, January 27, 2014

Coffee Filter Bunting

Minne-Mama is on Facebook! 'Like' us to stay updated on our fun crafts and activities!
Thank you for stopping by!

Happy Monday! We had such a wonderful weekend. I got pedicures and watched a movie with girlfriends while daddy and Skyler did science experiments at home (baking soda and vinegar reactions were a huge hit with baby boy!), Joe had another soccer game Saturday night that Skyler and I went to, and we went out for brunch on Sunday with my family. It was the perfect mix of relaxing and fun filled.

We are yet again trying to survive a cold wave in Minnesota. Our ECFE class has been cancelled two of three weeks, which has been such a bummer! Having time for Skyler to interact with other little one's is not the only reason we do ECFE classes. I am really missing my time to talk with the other parents in our class!

Since we didn't have class this morning, we did a ton of crafting! Skyler did some beginning steps for many crafts and activities that we are going to compete and play with this week, but this one we finished completely and it has been a joy to look at all day!

This coffee filter bunting was a blast to make and could not have been more simple. To create the bunting, all we needed was coffee filters and red food coloring. We don't always have coffee filters on hand because we do not need them for our coffee maker, but now that we have this package, it will last forever!


We used two different methods to dye our coffee filters. For some of them, Skyler painted the food coloring and water mixture on with a paint brush. 


I folded some of the coffee filters in quarters and Skyler dipped them into the water and food coloring - he especially loved dipping them! He could have dipped the entire package of coffee filters in the red dye!


All of our coffee filters were set on wax paper to dry (which does not take long at all).


During Skyler's nap, I put up the first of our bunting banners, the dipped ones! I hung a piece of string along our new shelf that has been decorated with our potato stamped, hand and feet print, and kiss canvases. To hold up the string, I used little white felt hearts. The quartered coffee filters just had to be hung over the string - so easy!


To do the rest of our bunting, We dipped heart shaped cookie cutters into red paint and created the shapes on our painted coffee filters. While mama painted hearts on the coffee filters, baby boy painted hearts onto paper! (I am seeing four leaf clovers in our future with this method and green food coloring and paint!)


I cut out the hearts, and taped them onto two pieces of string which were also attached to the shelf using the felt stickers!


I love the two different looks of bunting on the shelf, and it looks so festive! You can tell I like it a lot because I took two million pictures ;)


When Joe came home and saw our latest decoration, he said "How long did these take to make??" It was funny to hear because even though they were very quick and easy to create, they look wonderful! The entire project probably only took half an hour. The small felt stickers that attach the strings to the shelf add the perfect touch of sweetness.

Friday, January 24, 2014

Valentine Kisses

Minne-Mama is on Facebook! 'Like' us to stay updated on our fun crafts and activities!
Thank you for stopping by!

On Valentine's Day last year, I was working at a childcare center as the lead teacher in an infant room. Skyler was in the room with me, and we brought these easy and cute edible Valentine's for the babies in our room. Of course, we were using bananas, but this could be done with other fruits and veggies as well (Will you peas be my Valentine? Pumpkins, sweet potatoes, etc. could all be fun to make into loving phrases!)


The first Valentine's Day with my little Valentine!

This year, we are making these cute Valentine's for Skyler's grandparents (act surprised when you see them, okay?) and his ECFE and music teachers! I made a canvas version to put on our shelf along with our potato stamp and printed canvases. The canvas we used was one of the two that I salvaged when our prints did not turn out. It was most recently seen with a quick coat of spray adhesive and some cute pink chevron scrapbook paper.  


To make our Valentine's, I cropped one of the photos from our 18 month photo shoot (with MJ Fotography, Inc.) that looked a little bit like Skyler was puckering up for a kiss. I added a kissy word and little heart in the corner, and printed off a bunch!


We had fun making Skyler "blow kisses" in the picture, by adding some hand prints with red paint near his mouth. All we had to do was glue the finished picture onto the scrapbook covered canvas, and our Valentine was complete!


Our final canvas decoration was added to the shelf! Now we are going to swap out the other decorations currently on the shelf and make some more Valentine themed things to fill in the cubbies!


The Valentine's we are giving to Skyler's teacher will not be on canvas, but I will write them a little note to go along with the picture that Skyler helped create for them!

Thursday, January 23, 2014

One Year in Our Home

Minne-Mama is on Facebook! 'Like' us to stay updated on our fun crafts and activities!
Thank you for stopping by!

This day last year, we closed on our home. Our offer was accepted on December 4th after three months of searching, visits to over thirty houses, and two failed offers. We were so looking forward to this day, and it has been an incredible first year in our home. We have made many changes, and there are several to-do tasks that still have not been completed. It feels like a day to celebrate. We were excited on this day last year, and I am still so excited that we found our perfect home. 


So happy that we just closed on our new home! :)


To see how far our home has come in the last year, I decided to compare the listing photos of our home to how it looks today. 

The Living Room


Not much has changed here, other than the added stuff. Since this is our only common area, we have a lot of toys in here and play in the living room often. I wanted to do a gallery wall behind the couch, and I was gifted the frames for my birthday, so that was something exciting to finish. Before Christmas there was a big red and gold papasan chair where Skyler's tent (and where the Christmas tree went) is now. The chair served as my inspiration for the room, but we love having the tent to play and read in. I find this room overcrowded, but it is definitely homey and we love spending time together here. The kitten on the rug is also our newest addition to the family, added within the last year as well ;)


The biggest change to the other side of the living room was the red accent wall by the fireplace. I painted that within weeks of moving in and I still love the color it adds! Of course, the room in the background looks quite different as well!

The Dining Room


Our dining room has been one of the biggest changes to our home. We painted the walls (along with both staircases and the upstairs hallway) a warm tan, which was such a welcome change from the stark white! We also took out the carpet and put in hard wood flooring, and got rid of the blinds, opting for curtains instead. You can see where our sensory bins are stored in this photo!
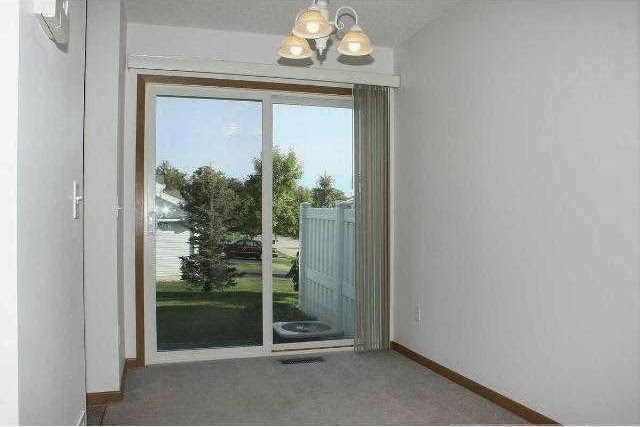

This better shows the changes of the wall color and flooring, and also the next thing we want to change out - the horrible light fixture! It has been on our to-do list, and after taking down the blinds and putting up the curtains just recently, the light fixture looks even worse!

The Kitchen


Again, the kitchen is mostly changed by the stuff that occupies it. I have big plans for this room. I have always intended to paint it (green is the plan) and I have some art to hang on a bare wall. We painted almost the entire house right after moving in, but I lost some steam after awhile, and the daunting kitchen was pushed off of my to-do list. I intended to paint last week, but it never happened. I would also love a window cover for this room. Though it is not my favorite room, it does hold all of our stuff perfectly.


The one thing I would love to change about this picture is the incredibly crowded corner that houses all of our coffee appliances. It is a frequently used area, so it is convenient, but not very eye appealing. We sure have a lot of coffee paraphernalia. Sorry, kitchen, that you do not get much love in the decorating department.

The Downstairs Bathroom


I loved the gray color in this room (the top photo better demonstrates what the color looks like), and we actually matched this color to paint our bedroom upstairs. To brighten it up, this room received many yellow accents. For the sake of this post, just going by the listing photos, you can see some of the changes, but not all. We added two white wall shelves behind the toilet and have extra towels, lotion and room spray, vases with yellow and white flowers, and woven yellow frames with photos of my all white wedding bouquet. Above the towel rack is a picture that Skyler colored in greys and yellows, and there are more flowers on the sink.  

The Upstairs Bathroom


Possibly the biggest transformation other than the dining room was our bathroom. I am a big fan of espresso and teal (our wedding colors) and I fell in love with this shower curtain. The artwork I painted, the bunny ring holder, and our rugs are the teal accents to accompany the curtain. We also added the cabinet and a hand towel rack next to the sink. The newest addition to this room is Skyler's beloved "potty!"

Skyler's Room


I have posted many photos of Skyler's room, so this one is not a huge surprise (and reflective surfaces were not my friend today as I took pictures in both bedrooms...blah!). The night we moved in, we set up Skyler's crib in our room, and my dad and I painted Skyler's room and closet. It was a fun way to spend our first hours at our home!

The Master Bedroom


The gray paint (that does not like to photograph) is the only big change to this room. We painted our room and the closet our first week in our home, we added the curtains, and I made a jewelry display in the closest inspired by a beautiful hanger given to me by a friend with my married name written in the wire. We also purchased our bed frame. Though it looks somewhat boring in the photo, in person our room is very calm and peaceful. I love how all the colors in the room play together, but there are still many changes I want to make. There was a large framed picture on the wall behind the tall dresser, but the frame broke and needs replacing. My biggest goal for this room is to paint our dressers. I am saving that big project for the summer, when we can take over the garage. I also want to get new side tables and  matching lamps. (Oh, and I guess our kitty Kina wanted to say "hi" as she ran to that spot and stared while I took pictures!)


The gallery wall in our room makes me very happy. There is a caricature from when we were in high school, pictures from our times in Grand Marais, and wedding pictures, among some other pieces of art. It showcases so many parts of our relationship, and I plan on adding to it. 

There are other areas of our home that were not pictured on the listing, including our laundry room, entry way, and garage. Of those three, the only one that looks somewhat different is the entry way. FINALLY, about two weeks ago we got a large rug, boot tray, coat hooks, and some baskets for winter gear. I was so so sick of mopping the tile floor from our snow covered shoes and having all of our winter gear clogging up our little closet in the dining room.  

I cannot wait to see what we accomplish in our second year living in our home!